How to Make a Drill Results Map
Import a collar CSV with hole IDs and WGS84 longitude/latitude, assign the Drillholes role, add a boundary for context and label selected results. Start with the downloadable 14-hole example below, then replace the fictional data with your reviewed project data.
What data you need
A drill results map is built from a collar table plus your headline intercepts. Gather:
- A drill collar CSV (one row per hole) with hole ID and coordinates
- Your best intercept per key hole (width × grade) for the labels
- A property/claims boundary file for context (GeoJSON, Shapefile, or KML)
- Your company logo and the program/map date
A downloadable example you can reproduce
The CSV contains 14 fictional Cedar Ridge collars, from CR-24-01 to CR-24-14. Longitude and Latitude are decimal degrees. Result contains illustrative label text. The boundary file uses the same coordinate system. Neither file represents a real exploration program.
Download the 14-collar CSV · Download its claim boundary · Sample notes and reuse
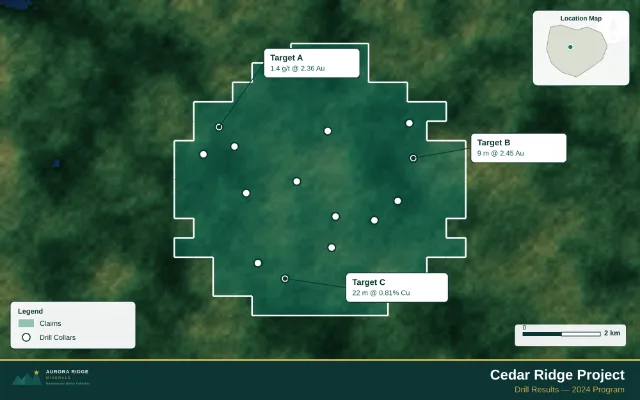
Required and recommended CSV columns
At minimum you need a hole ID and a coordinate pair. Everything else is preserved as feature properties you can show in callouts.
| Column | Required? | Example | Notes |
|---|---|---|---|
| Hole ID | Required | DDH-24-012 | Used as the callout title |
| Latitude | Required | 55.464373 | WGS84 decimal degrees |
| Longitude | Required | -127.241130 | WGS84 decimal degrees |
| Total depth (m) | Recommended | 248.5 | Context in callouts/tables |
| Best intercept | Recommended | 15.2m @ 4.8 g/t Au | The headline label |
| Azimuth / Dip | Optional | 135 / -50 | If you note hole orientation |
Step 1: Import the drill collar CSV
Open the upload workflow and select the CSV. Recognised latitude/longitude columns can import automatically. If the Column Mapper appears, select the coordinate columns and confirm them. The sample uses Longitude and Latitude; HoleID, Result and Status remain feature properties.
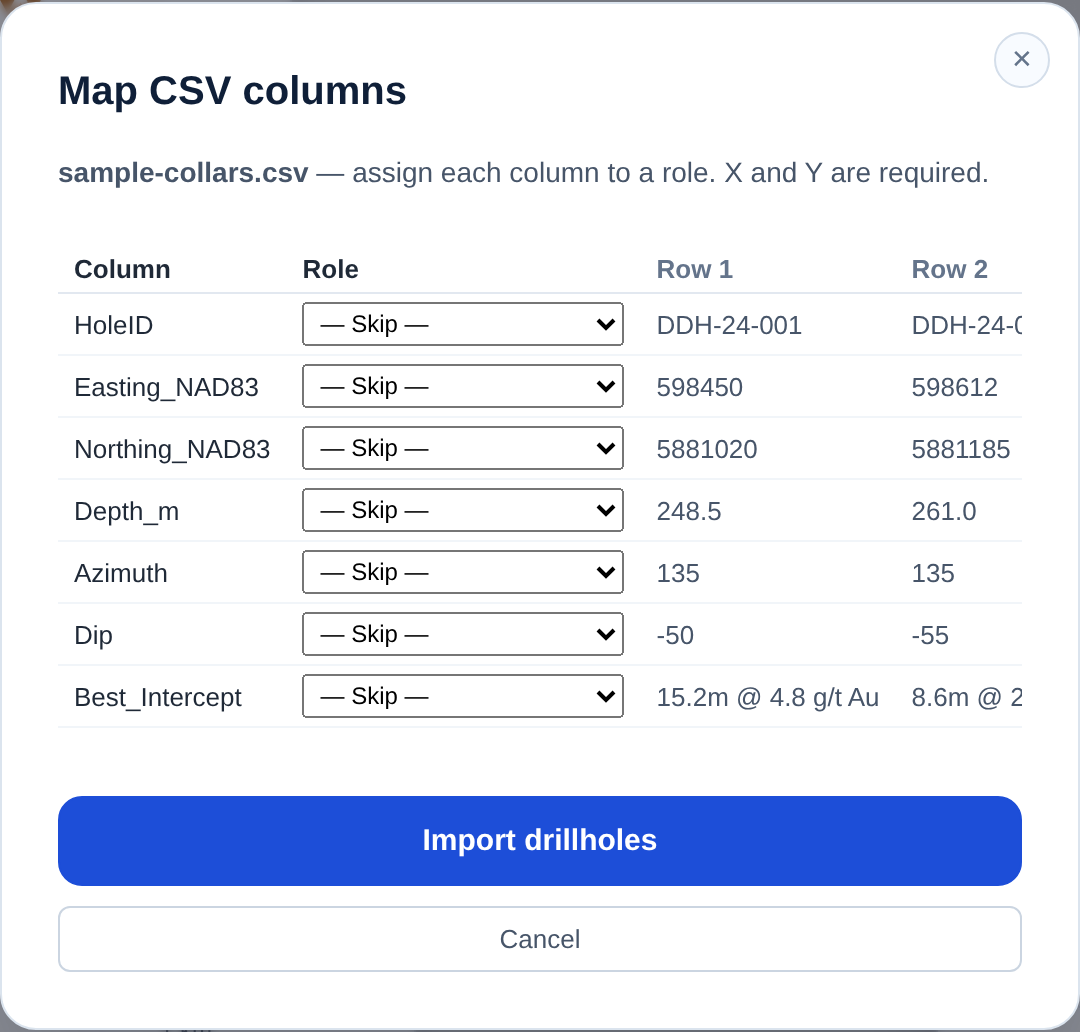
Common coordinate issues (and fixes)
Most drill maps that come out wrong are a coordinate problem, not a styling problem.
- Use decimal-degree WGS84 coordinates for the CSV. Convert UTM eastings/northings using the correct source zone and datum before importing.
- Check that longitude is assigned to longitude, and latitude to latitude.
- Keep negative signs for western longitudes and southern latitudes.
- Check against a known control point; do not infer positional accuracy from a plausible-looking basemap.
Step 2: Assign the Drillholes role
Expand the layer card and select 'Drillholes' from the Role dropdown for standard dark circle markers. A marker size of 12–16 px reads well at most scales.
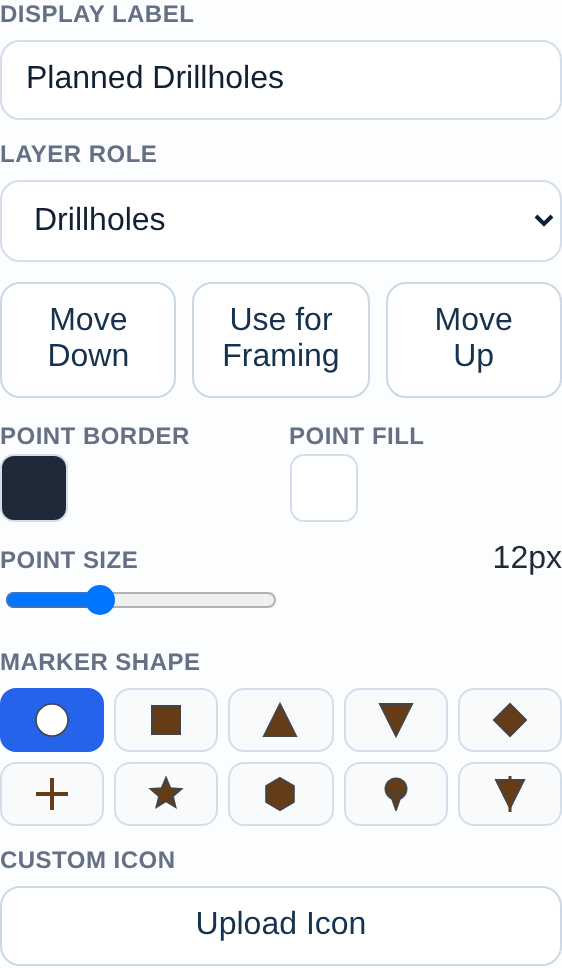
Step 3: Add hole-ID and intercept callouts
Click a hole to open the inline feature editor. Enter the hole ID as the title and the best intercept as the subtext — for example '15.2m @ 4.8 g/t Au' — then Add / Update Callout. For your top results, switch the callout type to 'Badge Label' and put the grade in the badge chip so the standout holes pop. Use the Priority field to keep labels from colliding on dense programs.
Presenting assay intercepts honestly
An intercept label is a compressed technical claim, and the compression is where figures get into trouble. The convention readers expect is width, grade and element — "32.0 m @ 6.1 g/t Au" — with the width stated as drilled core length unless you say otherwise.
Disclosure requirements for reporting exploration results sit with the issuer and its qualified person, not with a mapping tool. Where a figure supports a public disclosure, the QP determines what the figure has to state.
- Say "drilled width" or "core length" rather than implying true width unless true width is known
- Give the interval depth (from–to) in the release body even if the map label omits it for space
- Keep significant figures consistent between the map and the release text — a figure that disagrees with the body invites the wrong kind of attention
- Composite intervals should be identifiable as composites, not presented as single continuous hits
- If a hole is still pending, label it as pending rather than leaving it unlabelled and ambiguous
Callout discipline: label the story, not the dataset
The strongest instinct on a drill map is to label every hole, and it is the one worth resisting. A map with forty labels has no emphasis, so the reader supplies their own — usually by looking at whichever label is largest or closest to the middle.
- Badge the two to four holes that actually drive the news
- Leave the rest as plain collar symbols — the pattern is information on its own
- Put the label on the side of the collar with empty space, not the side with the target outline
- If two labels collide at the zoom you will export at, one of them is not important enough to keep
Step 4: Add the property boundary
Import your claims boundary as a second layer and assign the Claims role. This gives the drill pattern the property context investors and analysts expect to see.
Step 5: Frame and export for a news release
Choose a landscape layout for a slide or a page layout for a report figure. Fit all intended collars and labels inside the export frame. Include the project, program date, source and an explanation of the interval widths. Export at the size your publication needs, then inspect label legibility and compare every result with the reviewed source table.
Drill maps for a news release
In a junior mining news release the drill map is often the first thing a reader looks at, before the body text and frequently instead of it. That makes the figure the part carrying the result to anyone who skims, and it changes what the map has to do: it has to be legible to a non-technical audience at email and phone size.
Reuse the same figure in the investor deck and on the website so the story stays visually consistent across the release. A reader who saw the map on Tuesday should recognise it on Thursday. See making a professional exploration map for the layout elements, and the investor presentation guide for deck framing.
- Show the target outline and your claim boundaries so the holes are visibly testing the intended target, on your ground
- Use a clear basemap — satellite for setting, light for a report-style figure
- Title block with project, company and the release date
- Scale bar and north arrow, always
- Check legibility at the size it will appear, not at full screen
About the data and what to disclose
Cannot: validate assays, QA/QC, or that an intercept is true width. The map reflects the data you import — make sure your disclosure follows your QP's guidance and applicable securities rules.
Related guides
Continue with the drill-results map tool, the CSV import guide, and map layout and export guide.
How this guide was checked
Prepared by Exploration Maps. Workflow reviewed on September 15, 2026 against the current importer and editor. Demo files use fictional data; registry examples are dated observations. See our data coverage and methodology for sources, freshness and limitations.